
This is STEP 2 of Setting Up Your Facebook Pixel for Targeting
If you haven’t installed the Facebook Pixel on your site yet, head back here to do it. You won’t regret it!
Well what is a custom conversion anyway?
On Facebook ads, just like Google adwords and all those reports, you’ll get all the general performance results you would expect: Clicks, Reach, Impressions etc. However if you’ve set up an ad that you specifically want to make people come to your website, read the article and sign up for your newsletter, how will you know if the ad did just that?
Custom conversions my friend.
Custom conversions are the best way of knowing whether people are doing what you want them to do, it’s what will tell you if the money you’re paying is really doing what you want it to.
Before you can know what to advertise, you have to know what you want people to do.
So what is your conversion? What action do you want them to take? The most obvious would be a transaction – when someone buys something they ‘convert’ from a possibility to a real customer or client.
But you should definitely be tracking other conversions as well, in order to know how your ads to ‘cool’ clients are converting them to ‘warm’ for example:
- When someone signs up for your newsletter or downloads a freebie.
- When someone adds a product to their cart.
- When someone signs up for your webinar.
- When someone goes to your pricing page after reading one of your blog posts.
- When someone visits a product page
- When someone adds something to their wishlist
So now you know WHAT it is, here’s how to create one, and then how to see the results.
HOW TO CREATE A CUSTOM CONVERSION
Video: How to set up A CUSTOM CONVERSION
I hate videos, what are the instructions?
- Go to facebook.com/ads/manager. (This is assuming that you already have a Facebook advertising account connected to your profile. If you’ve ever boosted a post or run an ad, you have this account. If you don’t, you can set one up now)
- Click on the little hamburger menu icon at the top left of your screen, and then scroll over All Tools. A larger menu will pop out to the right. Click on Custom Conversions under Measure & Report:
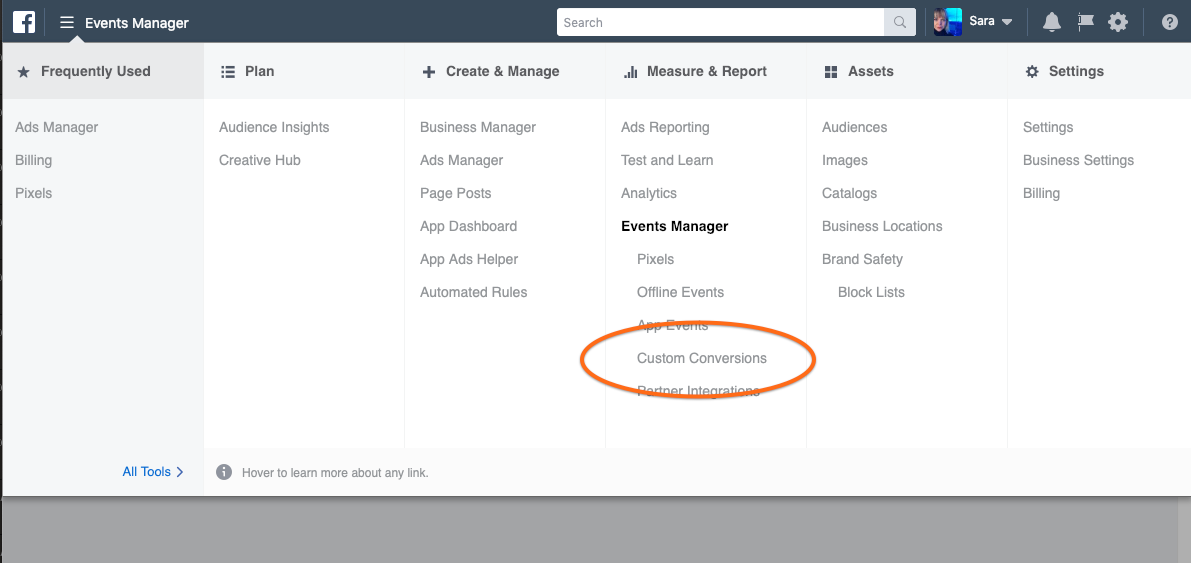
- When you get to that page, Click on the blue button that says Create Custom Conversion and you will see this window open:

- Fill in this form with the URL of the page that you consider the final point that indicates someone made that conversion, whether that is a thank you page for signing up, maybe you want to measure the conversions of add to cart, or of course the final transaction.
- Give it a name and select the category that closely matches your conversion intention, for instance for my thank you page conversion I selected “Lead” because if they’ve seen that page, they’ve become a lead by giving me their emails. Selecting this allows Facebook to optimise for the people who will actually convert, rather than just ‘like’ or click through but not fill in the form (Facebook KNOWS!)
- Value: If your conversion has a value, whether it’s an actualised one like a purchase, or a potential one like the value of your average sale, put it in here and FB will do the maths in your results.
- Hit Create.
Now you’ve set up the custom conversion, when you set up a Facebook ad, you will now be able to see if that specific ad made people go and do the exact thing you wanted.
So how do I see my custom conversion results?
In order to see your results, you’ll just need to tweak the Ads Manager columns so that you include your new custom conversions.
VIDEO: HOW TO VIEW YOUR CUSTOM CONVERSION RESULTS
TEXT INSTRUCTIONS:
To customise your ads manager view, click on the Campaigns tab, then click on the Columns drop down and select Customize Columns here:

This window will open, and if you click on Custom Conversions on the left, you can then check the boxes you want to add to your results columns. You can also adjust the order of the columns on the right hand side of that window.

Phew, well done.
So now you have 1. Set up your Facebook Pixel and 2. Set up a custom conversion, now you’re ready to set up a custom audience!
Pin me and share the love…




0 Comments